L’utilisation de la réalité augmentée (RA) est devenue une pratique courante dans le monde de l’art et de la technologie. Les artistes et les développeurs peuvent créer des expériences immersives et interactives en combinant des technologies telles que le traitement et l’ARToolkit. Dans ce troisième essai, nous allons explorer comment l’utilisation de l’ARToolkit et du traitement peut être utilisée pour créer une expérience unique et immersive : un cube RGB en lévitation ! Nous allons voir comment ces technologies peuvent être combinées pour créer une expérience interactive et immersive.
Processing – ARToolkit : Troisième essai utilisant ARToolkit et la réalité augmentée : RGB Cube en lévitation !
Par X. HINAULT – 16 Février 2012
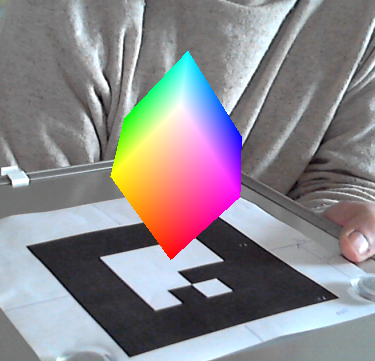
Capture du flux vidéo : après reconnaissance du marker, le RGB Cube est dessiné en 3D.
Explication
- Ce programme est une reprise de l’excellent tutoriel trouvé ici : http://www.creativeapplications.net/processing/augmented-reality-with-processing-tutorial-processing/ TOP!!
- Ce programme teste le tracé d’un cube RGB sur des markers reconnus grâce à l’utilisation de ARToolkit avec Processing à l’aide de la librairie nyar4psg, sur un flux vidéo issu d’une webcam. Remarquer la très grande fluidité du tracé 3D !
Matériel et configuration utilisés
- PC Intel Core Quad 2.33 Ghz
- Webcam(s) USB C270 Logitech
- Ubuntu 10.04 LTS
- Processing 1-5
- Librairie GSVideo 0.9
- nyar4psg 1.1.7
Ressources utiles
Le programme
Copier / coller ce code dans Processing L’image de test utilisée est en ligne !
Ne pas oublier de modifier les chemins utilisés en fonction de votre situation.
// Processing 1.5.1 + NyARToolkit 1.1.6 + GSVideo 1.0
import java.io.*; // for the loadPatternFilenames() function
import processing.opengl.*; // for OPENGL rendering
import jp.nyatla.nyar4psg.*; // the NyARToolkit Processing library
import codeanticode.gsvideo.*; // the GSVideo library
MultiMarker nya;
GSCapture cam;
// this is the arraylist that holds all the objects
ArrayList <ARObject> ars = new ArrayList <ARObject> ();
// a central location is used for the camera_para.dat and pattern files, so you don’t have to copy them to each individual sketch
// Make sure to change both the camPara and the patternPath String to where the files are on YOUR computer
// the full path to the camera_para.dat file
// String camPara = « C:/Users/mainframe/Documents/Processing/libraries/nyar4psg/data/camera_para.dat »;
// the full path to the .patt pattern files
// String patternPath = « C:/Users/mainframe/Documents/Processing/libraries/nyar4psg/patternMaker/examples/ARToolKit_Patterns »;
// the dimensions at which the AR will take place. with the current library 1280×720 is about the highest possible resolution.
//—– chemin absolu fichier de paramètres de distorsion de la camera —-
//String camParaPath = « /home/hinault/Téléchargements/librairies_processing/nyar4psg-1.1.6/data/camera_para.dat »;
String camParaPath = « /home/hinault/Téléchargements/processing-1.5/modes/java/libraries/NyAR4psg/data/camera_para.dat »;
//—– chemin absolu fichiers de description des « patterns » ou « markers » —-
String patternPath = « /home/hinault/Téléchargements/patternMaker/examples/ARToolKit_Patterns »;
// l’archive patternMaker est disponible ici : http://www.cs.utah.edu/gdc/projects/augmentedreality/download.html
int arWidth = 640;
int arHeight = 360;
//— taille de l’image webcam —
int widthCapture= 640;
int heightCapture=480;
int fpsCapture=20;
// the number of pattern markers (from the complete list of .patt files) that will be detected, here the first 10 from the list.
int numMarkers = 10;
String[] nameMarkers= new String[numMarkers]; // pour mémoriser le nom des marker
// the maximum rotation speed (x, y, z) at which the RGBCubes will rotate
float mS = 0.2;
void setup() {
size(widthCapture, heightCapture, OPENGL); // the sketch will resize correctly, so for example setting it to 1920 x 1080 will work as well
cam = new GSCapture(this, widthCapture, heightCapture); // initialize the webcam capture at a specific resolution (correct and/or possible settings depend on YOUR webcam)
//cam = new GSCapture(this, widthCapture, heightCapture,fpsCapture, »v4l2src », »/dev/video1″); // Initialise objet GSCapture désignant webcam
cam.start(); // start capturing
// initialize the MultiMarker at a specific resolution (make sure to input images for detection EXACTLY at this resolution)
nya = new MultiMarker(this, arWidth, arHeight, camParaPath, NyAR4PsgConfig.CONFIG_DEFAULT);
// set the delay after which a lost marker is no longer displayed. by default set to something higher, but here manually set to immediate.
nya.setLostDelay(1);
// load the pattern filenames (markers)
String[] patterns = loadPatternFilenames(patternPath);
// for the selected number of markers…
for (int i=0; i<numMarkers; i++) {
// add the marker for detection
nya.addARMarker(patternPath + « / » + patterns[i], 80);
// and create an ARObject with the corresponding ‘ID’
ars.add(new ARObject(i));
}
// set the color range to 1 (instead of 255), saves typing for the coloring of the cube
colorMode(RGB, 1);
// turn off stroke for the rest of the sketch
noStroke();
}
void draw() {
// if there is a cam image coming in…
if (cam.available()) {
cam.read(); // read the cam image
background(0); // a background call is needed for correct display of the marker results
image(cam, 0, 0, width, height); // display the image at the width and height of the sketch window
// create a copy of the cam image at the resolution of the AR detection (otherwise nya.detect will throw an assertion error!)
PImage cSmall = cam.get();
cSmall.resize(arWidth, arHeight);
nya.detect(cSmall); // detect markers in the image
// set the AR perspective uniformly, this general point-of-view is the same for all markers
nya.setARPerspective();
// run all the ARObjects’s in the arraylist => most things are handled inside the ARObject (see the class for more info)
for (ARObject ar : ars) { ar.run(); }
// reset to the default perspective
perspective();
}
}
// this function loads .patt filenames into a list of Strings based on a full path to a directory (relies on java.io)
String[] loadPatternFilenames(String path) {
File folder = new File(path);
FilenameFilter pattFilter = new FilenameFilter() {
public boolean accept(File dir, String name) {
return name.toLowerCase().endsWith(« .patt »);
}
};
return folder.list(pattFilter);
}
// class that defines the AROBject, both the AR detection and display are handled inside this class
class ARObject {
int ID; // keep track of the current the ID of the object (corresponds with the ID i of the marker)
PVector rot, speed; // in this example the cube has a certain rotation and rotates at a certain speed
ARObject(int ID) {
this.ID = ID; // set the ID
rot = new PVector(random(TWO_PI), random(TWO_PI), random(TWO_PI)); // random x, y, z rotation
speed = new PVector(random(–mS, mS), random(–mS, mS), random(–mS, mS)); // random x, y, z speed (within maxSpeed boundaries)
}
void run() {
// always keep rotating (even when the marker is NOT detected)
rot.add(speed);
// checks the object’s corresponding marker through the ID
// if the marker is found, display the cube
if (nya.isExistMarker(ID)) { display(); }
}
// the display in this example shows a colored, rotating RGBCube
void display () {
// get the Matrix for this marker and use it (through setMatrix)
setMatrix(nya.getMarkerMatrix(ID));
scale(1, –1); // turn things upside down to work intuitively for Processing users
// hover the cube a little above the real-world marker image
translate(0, 0, 30);
// rotate the cube in 3 dimensions
rotateX(rot.x);
rotateY(rot.y);
rotateZ(rot.z);
// scale – as with the the color range – to save typing with the coordinates (and make it much easier to change the size)
scale(15);
// a cube made out of 6 quads
// the 1 range can be used for both the color and the coordinates as a result of color range and scale (see earlier)
beginShape(QUADS);
fill(0, 1, 1); vertex(–1, 1, 1);
fill(1, 1, 1); vertex( 1, 1, 1);
fill(1, 0, 1); vertex( 1, –1, 1);
fill(0, 0, 1); vertex(–1, –1, 1);
fill(1, 1, 1); vertex( 1, 1, 1);
fill(1, 1, 0); vertex( 1, 1, –1);
fill(1, 0, 0); vertex( 1, –1, –1);
fill(1, 0, 1); vertex( 1, –1, 1);
fill(1, 1, 0); vertex( 1, 1, –1);
fill(0, 1, 0); vertex(–1, 1, –1);
fill(0, 0, 0); vertex(–1, –1, –1);
fill(1, 0, 0); vertex( 1, –1, –1);
fill(0, 1, 0); vertex(–1, 1, –1);
fill(0, 1, 1); vertex(–1, 1, 1);
fill(0, 0, 1); vertex(–1, –1, 1);
fill(0, 0, 0); vertex(–1, –1, –1);
fill(0, 1, 0); vertex(–1, 1, –1);
fill(1, 1, 0); vertex( 1, 1, –1);
fill(1, 1, 1); vertex( 1, 1, 1);
fill(0, 1, 1); vertex(–1, 1, 1);
fill(0, 0, 0); vertex(–1, –1, –1);
fill(1, 0, 0); vertex( 1, –1, –1);
fill(1, 0, 1); vertex( 1, –1, 1);
fill(0, 0, 1); vertex(–1, –1, 1);
endShape();
}
}
Articles Liés
- ARToolkit avec Processing
L'ARToolkit est un outil puissant qui permet aux développeurs de créer des applications de réalité…
- Processing – ARToolkit : Premier essai utilisant ARToolkit et la réalité augmentée
Processing et ARToolkit sont deux outils puissants qui permettent aux développeurs de créer des applications…
- Processing – ARToolkit : Second essai utilisant ARToolkit et la réalité augmentée
Processing et ARToolkit sont deux outils puissants qui permettent aux développeurs de créer des applications…


